Tempting... but not good enough to be willing to go urchin free ;)Originally Posted by Mr Cob


 Web Member
Tempting... but not good enough to be willing to go urchin free ;)
Karin
Web Member
Yep, Ace is right.
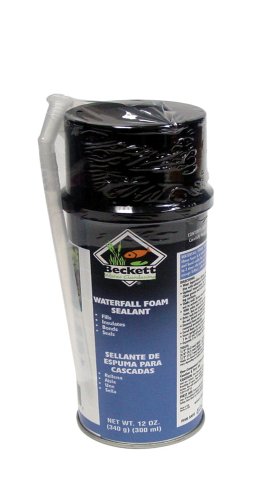
-Black Waterfall foam. About $13-$15 per can and Lowes and Home Depot only stock 5-10 cans per week so it's worth calling before going by...BUT most of the time they don't know what I'm talking about anyways and they say "no" we don't carry it. It's found outside in the pond equipment section.
-Use Aquarium sealant or aqaurium safe clear sealant under the foam...just spread drops around...this helps mount the foam longterm. Without the sealant the foam will start to come loose after a year or two.
-spray foam (wear gloves and make sure the surface is laying flat).
-distress the foam as it bubbles up. Use a stick to poke the bubbles and move them around, this will give a more natural "rock" look instead of the "foam poop" look.
-add some black tubing in the foam to make some frag racks or blenny holes. In my 144 I used huge black pvc tubes to make tunnels.
-spread crushed coral/sand/aragonite over the foam while it's still wet. The sand will add texture to make for a more realist look and help coraline take off by giving it something to stick too.
-let cure
LOL, yeah...both my urchins are in the sump for digesting foam! It was definitely worth seeing though!
Last edited by Mr Cob; Wed, 9th Jun 2010 at 12:52 PM.
Web Member
Foam brands... (I used 3 cans on the 75g and 5 cans on my 144)

Web Member
Also, I used 3 tubes of sealant under the foam on the 75g and 5 tubes on the 144g.
Web Member
In addition to your steps, I epoxied on top of the foam. I also put mine on egg crate and created three panels across the back. I can remove the panels (which I have only done once). I am a big fan of the foam.
Web Member
^nice... created a new thread for sharing foam porjects:
http://www.maast.org/showthread.php?...ng-all-foamers....
Now you need to go post some pics there

 Reply With Quote